이 글에서는 Angular 실전 애플리케이션을 작성하며 아래 목록의 기능들을 사용, 구현해 보겠습니다.
- Feature Modules
- ReactiveFormsModule(FormBuilder, FormGroup, Validators)
- Routing(라우팅), Lazy Loading(지연 로딩)
- Authentication(인증), State Management(상태 관리 - ngrx/store, ngrx/effects)
- Directive(사용자 정의 디렉티브)
SPA에서 필수적인 라우팅 기능과 각 컴포넌트별 접근권한을 로그인(인증)정보로 체크하며, 인증정보 상태 관리를 할 수 있는 ngrx를 이용해 보겠습니다.
Prerequisite
- Angular
- Tutorial - Tour of Heroes
- Feature Modules
- ECMAScript6
- TypeScript
1. 모듈 구조
Angular 의 주요 특징 중 하나로 Component 기반 구조를 들 수 있습니다. 따라서 Angular 프로젝트를 처음 시작하기 전에 Component 구조에 대해서 설계를 해야 합니다.
Component 들로만 프로젝트를 구성할 수 있지만 Component들을 Module 단위로 묶어서 사용할 수 있습니다. 이것을 Feature Module이라 합니다. (Feature Module 은 다음장에서 설명하겠습니다.)
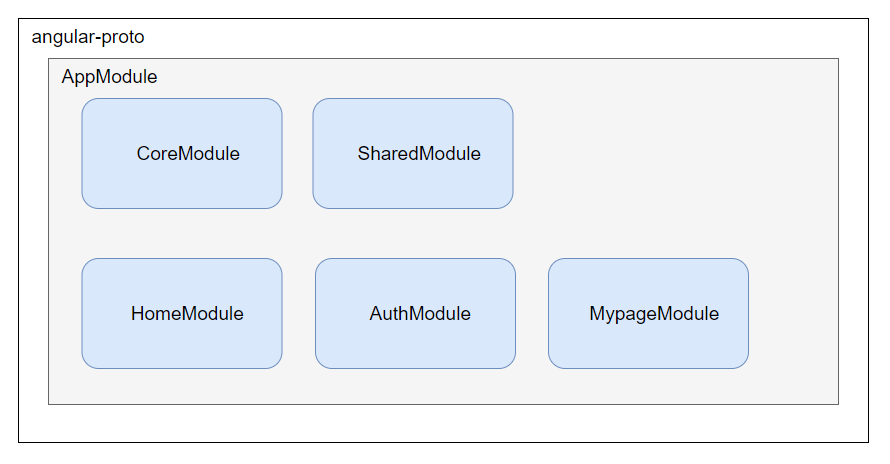
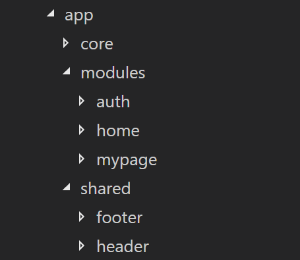
이번장의 프로젝트 이름은 angular-proto이고 Module들의 목록은 위와 같습니다.
| 번호 | 모듈명 | 설명 |
| 1 | AppModule | Angular 기본 Module |
| 2 | CoreModule | InMemoryDbService, HttpInterceptor, Model, RouterGuard, HttpClient (...) |
| 3 | SharedModule | Header, Footer, 404 page, 사용자정의 Directive, 공통에러 Dialog (여러 화면에서 사용하는 UI 컴포넌트 및 UI관련 기능) |
| 4 | HomeModule | HomeComponent - 메인페이지 |
| 5 | AuthModule | LoginFormComponent - 로그인페이지 |
| 6 | MypageModule | MypageComponent - 마이페이지 |
2. 프로젝트 생성
1) angular-cli를 이용하여 새로운 프로젝트 생성
ng new angular-proto
2) 폴더 이동 및 애플리케이션 실행
cd angular-proto
ng serve --open
--open 옵션은 애플리케이션 실행이 완료되면 브라우저에서 새창으로 해당 애플리케이션을 요청합니다.
(종료 : 커맨드 창에서 - Ctrl + C)
3. 모듈 생성
1) angular-cli 를 이용하여 미리 설계한 모듈들을 생성합니다.
ng g m core
ng g m shared
ng g m modules/auth
ng g m modules/home
ng g m modules/mypage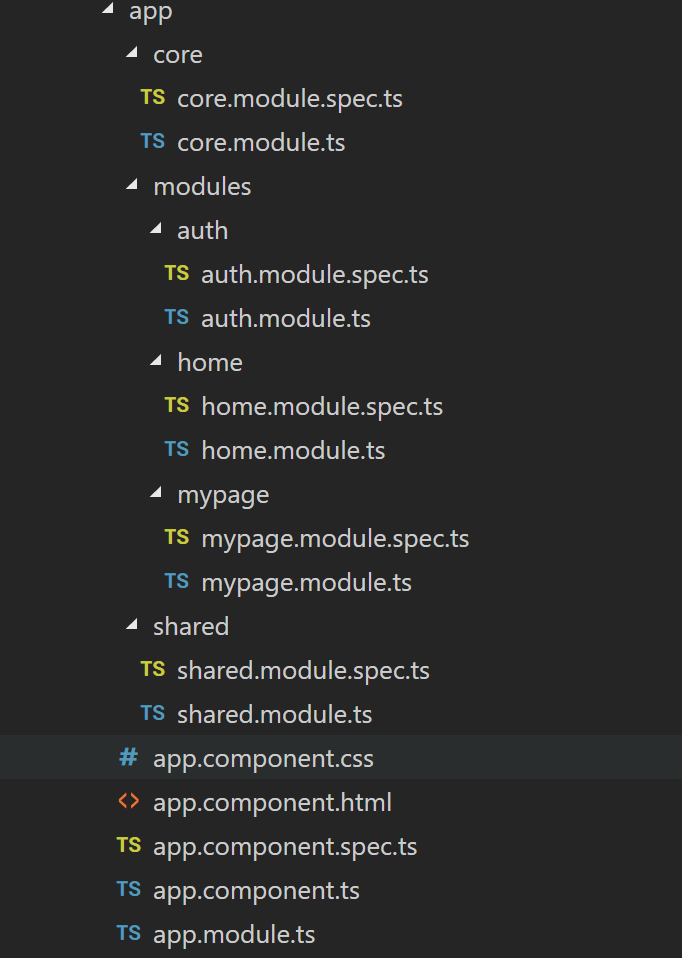
컴포넌트, 모듈, 서비스 등을 생성 시 any.module.spec.ts 파일은 테스트 코드 작성 파일입니다. 불필요하다 생각하시는 분은 Project폴더 루트에 angular.json 파일에서 옵션을 수정하여 생성되지 않도록 할 수 있습니다.
"projects": {
    "user": {
      ...
      "schematics": {
        "@schematics/angular:component":{
          "spec": false
        },
        "@schematics/angular:class":{
          "spec": false
        },
        "@schematics/angular:directive":{
          "spec": false
        },
        "@schematics/angular:guard":{
          "spec": false
        },
        "@schematics/angular:module":{
          "spec": false
        },
        "@schematics/angular:pipe":{
          "spec": false
        },
        "@schematics/angular:service":{
          "spec": false
        }
      }
...
4. 기본 페이지 작성
초기화면을 구성하기 위해 header, footer 컴포넌트를 작성하여 기본 layout을 구성하겠습니다.
1) 컴포넌트 생성
ng g c shared/header
ng g c shared/footer
2) 모듈 import, export
컴포넌트를 angular-cli를 이용하여 생성하면 특정 모듈 아래로 생성했을 경우 해당 모듈의 declarations에 자동으로 추가됩니다.
해당 컴포넌트를 다른 모듈에서 사용할 경우 본인이 속한 모듈에서 exports에 추가해주어야 해당 모듈을 imports 하고 있는 모듈에서 허용할 수 있습니다.
[shared.module.ts]
import ... 생략

@NgModule({
  imports: [
    CommonModule
  ],
  declarations: [
    HeaderComponent,
    FooterComponent
  ],
  exports: [
    HeaderComponent,
    FooterComponent
  ]
})
export class SharedModule { }
[app.module.ts]
import ... 생략

@NgModule({
  declarations: [
    AppComponent
  ],
  imports: [
    BrowserModule,
    SharedModule
  ],
  providers: [],
  bootstrap: [AppComponent]
})
export class AppModule {}
3) app.component.html 작성
<div>
  <app-header></app-header>
  <div>BODY</div>
  <app-footer></app-footer>
</div>
4) 실행 및 확인

Chrome 확장 프로그램 Augury를 설치했다면 개발자 도구에서 컴포넌트 목록을 확인할 수 있습니다.
5. 프로젝트 폴더 구조
Conclusions
다음장에서는 Feature Modules에 대한 자세한 설명과 Component 작성, 라우터 설정, Lazy Loading에 대해서 설명하겠습니다.
'Front-end Framework > Angular' 카테고리의 다른 글
| [실전 어플리케이션 만들기] 6. Directive (0) | 2020.10.20 |
|---|---|
| [실전 어플리케이션 만들기] 5. 사용자 인증(2) - ngrx/store, ngrx/effect (0) | 2020.10.20 |
| [실전 어플리케이션 만들기] 4. 사용자 인증(1) - In-memroy service, Authentication service (0) | 2020.10.20 |
| [실전 어플리케이션 만들기] 3. 로그인 Form 작성 (0) | 2020.10.20 |
| [실전 어플리케이션 만들기] 2. Feature Modules과 Routing (0) | 2020.10.20 |


댓글