이전 글의 프로젝트 구조에서 여러 Module들이 존재하는 것을 보았습니다. 이는 실전 애플리케이션 예제가 Feature Modules로 구성되어 있기 때문입니다. 이 글에서는 Feature Modules가 무엇인지 알아보고, 실제로 컴포넌트들을 구성해보도록 하겠습니다. 또한 만들어진 컴포넌트들에 라우팅 정보를 넣어주도록 하겠습니다.
1. Feature Modules?
Feature Modules란 코드를 특정한 구조로 체계화하기 위해서 사용하는 NgModules입니다.어플리케이션이 커지면 커질수록 root modules 방식(app.module.ts에 모든 컴포넌트와 서비스, 모델 등을 등록하는 방식)으로 구성하기에는 무리가 있습니다. 가독성이 떨어질 뿐만 아니라, 관리하기 어려울 정도로 루트 모듈의 크기가 커지게 됩니다.
특히 Feature 모듈은 연관된 특성들끼리 묶어 구조화하는데 있어, 특성에 대한 명확한 경계를 알려줄 수 있습니다. 즉, 특정한 기능 단위로 묶어, 다른 코드와 분리시킬 수 있습니다. 앞으로는 루트 모듈에는 Feature 모듈 정도만 등록해 두고, 기존에 등록되어 있던 컴포넌트나 서비스 등은 자신의 특성에 맞는 각자의 Feature 모듈에 등록하도록 할 것입니다.
더 자세한 내용은 Angular의 Feature Modules 공식 Document를 참조하시기 바랍니다.
2. Module 생성
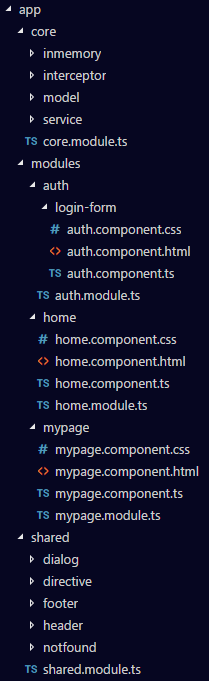
앞 장에서 생성했던 core와 shared, modules 아래에 각각 모듈 파일을 생성해 줄 것이며, modules 아래에는 Feature별로 폴더를 세분화할 것이기 때문에 세분화된 폴더 별로 모듈 파일을 가지게 될 것입니다.
이 글에서 다루는 로그인 예제에는 3개의 모듈이 필요하고 이 모듈들은 각각의 모듈 파일을 가집니다. 생성해야 할 컴포넌트는 auth와 home, mypage입니다.
home과 mypage는 단순히 welcome 메시지만을 출력하는 컴포넌트로 html만 일부 수정해 주도록 하겠습니다.
[home.component.html]
<div>
Home
</div>
[mypage.component.html]
<div>
Mypage
</div>
auth의 경우 login에 대한 기능을 수행하기 때문에 다음 글에서 자세히 다루도록 하고, 각 각의 module.ts 파일을 살펴보도록 하겠습니다.
[home.module.ts]
@NgModule({
  imports: [
    SharedModule
  ],
  declarations: [HomeComponent]
})
export class HomeModule {}
[mypage.module.ts]
@NgModule({
  imports: [
    SharedModule
  ],
  declarations: [MypageComponent]
})
export class MypageModule {}
[auth.module.ts]
@NgModule({
  imports: [
    SharedModule
  ],
  declarations: [LoginFormComponent]
})
export class AuthModule {}
각 각의 Feature에 해당하는 컴포넌트를 declarations에 추가해준 것 외에는 모두 동일하게 SharedModule이 추가되어 있는 것을 보실 수 있습니다. Shared 모듈은 로그인 애플리케이션 전체에서 공유하여 사용되는 것들을 등록해 놓은 곳으로 아래와 같습니다.
[shared.module.ts]
@NgModule({
  imports: [
    CommonModule,
    MatButtonModule,
    MatFormFieldModule,
    MatIconModule,
    MatInputModule,
    MatMenuModule,
    RouterModule,
    HttpClientModule,
    MatCardModule,
    MatToolbarModule,
    MatDialogModule
  ],
  declarations: [
    HeaderComponent,
    FooterComponent,
    NotfoundComponent,
    AuthDirective,
    AlertDialog
  ],
  exports: [
    HeaderComponent,
    FooterComponent,
    NotfoundComponent,
    MatButtonModule,
    MatFormFieldModule,
    MatIconModule,
    MatInputModule,
    MatMenuModule,
    AuthDirective,
    HttpClientModule,
    MatCardModule,
    MatDialogModule
  ],
  entryComponents: [
    AlertDialog
  ]
})
export class SharedModule { }
shared 모듈이 아주 많은 정보를 가지고 있는 것을 보실 수 있습니다.
- CommonModule : ngIf, ngFor와 같은 디렉티브를 사용하기 위해 넣어주는 모듈
- Mat*Module : Mat으로 시작하는 모듈들은 Angular Material의 모듈들입니다. Material에 대한 내용은 Angular Material에서 확인해보시기 바랍니다.
- RouterModule : 아래에서 다룰 라우팅을 사용하기 위한 모듈
- HttpClientModule : 서버단으로 http 요청을 보내고 받기 위해 사용하는 모듈
- 그 외 : AuthDirective나 AlertDialog, HeaderComponent, FooterComponent 등 기타 추가된 내용은 앞으로 작성할 커스텀 컴포넌트와 디렉티브이며 여러 위치에서 사용되므로 shared module에 등록되어 있습니다.
현재 core.modules.ts의 경우 등록이 필요한 내용이 없어 생략하도록 하겠습니다.
3. Routing
라우팅에 대한 정보를 각 각의 컴포넌트 상단에 기재하여 모듈 파일에서 등록해 줄 수 도 있지만, 로그인 애플리케이션에서는 각 각의 라우팅 파일을 만들어서 기재해 줄 것입니다. 그러므로 먼저 home, auth, mypage 폴더에 라우팅 파일을 만들어줍니다. 라우팅 파일은 컴포넌트명-routing.module.ts 로 만들어지며 모듈을 만드는 것과 동일하게 생성하시면 됩니다.
또한 중요한 점은 app 컴포넌트, 즉, 루트 컴포넌트를 위한 라우팅 파일 역시 존재해야 한다는 점입니다.
그러면 폴더 구조가 아래와 같이 변경되게 됩니다.

이제 라우팅에 대한 정보를 이 라우팅 모듈들에 기재해 주어야 할 차례입니다.
로그인 어플리케이션에서는 아래와 같은 라우팅 url들이 필요합니다.
| 컴포넌트 | 라우팅되는 결과 | 라우트 URL |
| Home | 메인 페이지 노출 | '/' |
| LoginForm | 로그인 폼 페이지 노출 | '/auth/loginForm' |
|
Mypage |
마이페이지 노출 |
'/mypage' |
LoginForm과 Mypage는 Lazy loading 될 것이므로 아래에서 다루도록 하고 Home 라우팅에 대해 보도록 하겠습니다.
[home.routing.module.ts]
const routes: Routes = [
  {
    path: '',
    component: HomeComponent
  }
];

@NgModule({
  imports: [RouterModule.forChild(routes)],
  exports: [RouterModule]
})
export class HomeRoutingModule {}
Home 컴포넌트는 '' 혹은 '/'에 해당하는 경로로 매핑됩니다.
페이지의 contents부분에서 화면이 교체되기를 원하므로 app.component.ts를 아래와 같이 수정합니다.
[app.component.ts]
<div>
  <app-header></app-header>
  <div class="contents">
    <main [@fadeAnimation]="appOutlet.isActivated ? appOutlet.activatedRoute : ''">
      <router-outlet #appOutlet="outlet"></router-outlet>
    </main>
  </div>
  <app-footer></app-footer>
</div>
참고. 위에서 추가된 메인 div는 애니메이션을 포함하는 router-outlet 정보로써, 애니메이션에 대한 내용은 따로 다루지 않겠습니다. 자세한 내용은 Animations에서 확인하시기 바랍니다.
4. Lazy Loading
사용자가 처음 홈페이지에 들어왔을 때 필요한 화면은 Home화면뿐이므로, 전체 애플리케이션에 대한 정보가 필요한 것이 아니라, Home에 관련된 정보만 있으면 됩니다. 그러므로 이를 라우팅을 기준으로 분리하여 모든 라우팅 정보들을 처음부터 로딩해 놓는 것이 아니라, 해당하는 url이 입력되었을 때 로딩하도록 하겠습니다. 이를 Lazy Loading(지연 로딩)이라고 하며, Auth와 Mypage는 지연 로딩될 것입니다.
애플리케이션은 처음 로딩될 때, 특정 컴포넌트에 대한 라우트가 지연 로딩된다는 정보를 알고 있어야 합니다. 그러므로 app.routing.module.ts에 아래와 같이 기재합니다.
const routes: Routes = [
  {
    path: 'auth',
    loadChildren: './modules/auth/auth.module#AuthModule',
  },
  {
    path: 'mypage',
    loadChildren: './modules/mypage/mypage.module#MypageModule',
  }
];

@NgModule({
  imports: [RouterModule.forRoot(routes)],
  exports: [RouterModule]
})
export class AppRoutingModule {}
forRoot메서드는 로그인 애플리케이션의 메인 모듈에서 어플리케이션의 루트 정보를 정의할 때 사용합니다.
app.routing.module.ts에서는 항상 forRoot로 라우트 정보를 임포트 해주어야 합니다. 이 메서드는 routes의 라우터 설정 정보에 담긴 지시자나 컴포넌트의 정보를 합해서 애플리케이션 단위의 모듈을 만들어줍니다. 반대로 특정 모듈에서 지연 로딩에 대한 라우팅 설정을 할 때에는 forChild를 사용합니다. 루트 모듈이 맨 처음 한번 시작 포인트를 가지기 때문에 지연 로딩과 같은 경우에는 시작 포인트에서 초기화되지 않아 오류가 발생하기 때문입니다.
[mypage-routing.module.ts]
const routes: Routes = [
  {
    path : '',
    component : MypageComponent
  }
];

@NgModule({
  imports: [RouterModule.forChild(routes)],
  exports: [RouterModule]
})
export class MypageRoutingModule { }
app에서 지연 로딩으로 등록한 mypage는 현재 ''라는 path를 가지고 있으므로 '/mypage'에 매핑될 것입니다. mypage의 경우 로그인되지 않은 사용자일 경우 이 경로에 대하여 접근이 불가능하게 처리해 주어야 하는데 이에 대해서는 마지막 7장에서 다루도록 하겠습니다.
[auth-routing.module.ts]
const routes: Routes = [
  {
    path: 'loginForm',
    component: LoginFormComponent
  }
];

@NgModule({
  imports: [RouterModule.forChild(routes)],
  exports: [RouterModule]
})
export class AuthRoutingModule { }
auth의 경우 'loginForm'라는 path를 가지고 있으므로 loginForm 페이지를 출력하기 위해서는 '/auth/loginForm'으로 접근해야 합니다.
[references]
Angular의 Feature Modules 공식 Document
Angular
angular.io
Authentication in Angular with NGRX
In this tutorial, we’ll add authentication to Angular using NGRX Store and Effects. This post assumes that you a have basic working knowledge of Angular (2+), TypeScript, RxJS and the Redux design pattern. If you’re new to NGRX, check out the awesome C
mherman.org
Angular
angular.io
Angular Material
UI component infrastructure and Material Design components for Angular web applications.
material.angular.io
'Front-end Framework > Angular' 카테고리의 다른 글
| [실전 어플리케이션 만들기] 6. Directive (0) | 2020.10.20 |
|---|---|
| [실전 어플리케이션 만들기] 5. 사용자 인증(2) - ngrx/store, ngrx/effect (0) | 2020.10.20 |
| [실전 어플리케이션 만들기] 4. 사용자 인증(1) - In-memroy service, Authentication service (0) | 2020.10.20 |
| [실전 어플리케이션 만들기] 3. 로그인 Form 작성 (0) | 2020.10.20 |
| [실전 어플리케이션 만들기] 1. 프로젝트 구조 및 생성 (0) | 2020.10.20 |


댓글