Authentication Server는 User 정보를 입력받아, 유효한 User인 경우 JWT Token을 발급해줍니다.
pom.xml
user 정보를 mariadb에서 관리합니다. 따라서 air-mariadb-starter를 상속받습니다. 따라서 authentication을 위해 2개의 library를 추가해 주어야 합니다.
- spring-boot-starter-security
- spring-security-oauth2-autoconfigure
<?xml version="1.0" encoding="UTF-8"?>
<project xmlns="http://maven.apache.org/POM/4.0.0" xmlns:xsi="http://www.w3.org/2001/XMLSchema-instance"
    xsi:schemaLocation="http://maven.apache.org/POM/4.0.0 https://maven.apache.org/xsd/maven-4.0.0.xsd">
    <modelVersion>4.0.0</modelVersion>
    <parent>
        <groupId>kr.sys4u.lab</groupId>
        <artifactId>air-mariadb-starter</artifactId>
        <version>0.0.1-SNAPSHOT</version>
        <relativePath/> <!-- lookup parent from repository -->
    </parent>
    <groupId>kr.sys4u.lab</groupId>
    <artifactId>air-auth</artifactId>
    <version>0.0.1-SNAPSHOT</version>
    <name>air-auth</name>
    <description>Demo project for Spring Boot</description>

    <properties>
        <jwt.version>0.9.1</jwt.version>
    </properties>

    <dependencies>
        <dependency>
            <groupId>org.springframework.boot</groupId>
            <artifactId>spring-boot-starter-security</artifactId>
        </dependency>
        <dependency>
            <groupId>io.jsonwebtoken</groupId>
            <artifactId>jjwt</artifactId>
            <version>${jwt.version}</version>
        </dependency>

        <dependency>
            <groupId>org.springframework.boot</groupId>
            <artifactId>spring-boot-starter-test</artifactId>
            <scope>test</scope>
            <exclusions>
                <exclusion>
                    <groupId>org.junit.vintage</groupId>
                    <artifactId>junit-vintage-engine</artifactId>
                </exclusion>
            </exclusions>
        </dependency>
        <dependency>
            <groupId>org.springframework.security</groupId>
            <artifactId>spring-security-test</artifactId>
            <scope>test</scope>
        </dependency>
        <dependency>
            <groupId>org.springframework.security.oauth.boot</groupId>
            <artifactId>spring-security-oauth2-autoconfigure</artifactId>
            <version>2.0.0.RELEASE</version>
        </dependency>
    </dependencies>

    <build>
        <plugins>
            <plugin>
                <groupId>org.springframework.boot</groupId>
                <artifactId>spring-boot-maven-plugin</artifactId>
            </plugin>
        </plugins>
    </build>

</project>
application.yml
authentication server를 위해 필요한 설정은 없습니다만, air-auth가 mariadb를 사용하고 eureka-client이기 때문에 해야 하는 설정들이 있습니다.
server:
  port: 8084
  servlet:
    context-path: /auth


logging:
  level:
    root: INFO
spring:
  application:
    name: air-auth
  datasource:
    driverClassName: net.sf.log4jdbc.sql.jdbcapi.DriverSpy
    url: jdbc:log4jdbc:mariadb://13.209.8.232:30001/air_test
    username: air
    password: air#

mybatis:
  mapper-locations: classpath:/mybatis/**/*.xml
  type-aliases-package: kr.sys4u.lab.airauth.model
  configuration:
    map-underscore-to-camel-case: true
    default-fetch-size: 100
    default-statement-timeout: 30

eureka:
  client:
    service-url:
defaultZone: http://localhost:7979/eureka- 3~4라인: 이는 authentication server를 구동시키기 위해 꼭 필요한 세팅은 아닙니다. authentication server가 오픈한 api의 path prefix를 선언한 것입니다. spring-security가 자동으로 생성시키는 몇몇의 api가 있는데, 그 api의 url prefix도 이 설정을 따릅니다.
WebSecurityConfig
@Configuration
@EnableWebSecurity
class WebSecurityConfig(@Autowired val dataSource: DataSource) : WebSecurityConfigurerAdapter() {

    @Throws(Exception::class)
    override fun configure(auth: AuthenticationManagerBuilder) {
        auth.userDetailsService(userDetailsService())
                .passwordEncoder(passwordEncoder())
    }

    @Bean
    fun passwordEncoder(): PasswordEncoder = BCryptPasswordEncoder()

    @Bean
    override fun authenticationManagerBean() : AuthenticationManager = super.authenticationManagerBean()

    @Bean
    override fun userDetailsService(): UserDetailsService = JdbcDaoImpl().apply {
        setDataSource(this@WebSecurityConfig.dataSource)
    }
}- 5~9라인: 입력된 User(username, password)가 유효한지 판별하기 위해 기준점이 되는 위치와 password 암호화 방식을 세팅해줍니다. 여기서는 mariadb에 그 정보들이 있기 때문에 dataSource를 세팅한 userDetailsService를 설정해주었지만, inmemory에 User 정보를 두고 싶다면 아래와 같이 설정하여야 합니다.
auth.inMemoryAuthentication()
      .withUser("john.carnell").password(encoder.encode("password1")).roles("USER")
      .and()
.withUser("william.woodward").password(encoder.encode("password2")).roles("USER", "ADMIN")- 11~12라인: password 암호화 방식은 Bcrypt를 사용.
- 17~20라인: userDetailsService에서 dataSource를 세팅. 이때, spring-security가 미리 지정한 테이블명과 필드명으로 저장해야 합니다. spring-security가 내부적으로 미리 만들어놓은 query를 통해 유효성을 판단하기 때문입니다.
spring-security를 위해 미리 만들어야 하는 테이블의 schema는 다음과 같습니다.
CREATE TABLE IF NOT EXISTS oauth_client_details (
client_id VARCHAR(256) PRIMARY KEY,
resource_ids VARCHAR(256),
client_secret VARCHAR(256) NOT NULL,
scope VARCHAR(256),
authorized_grant_types VARCHAR(256),
web_server_redirect_uri VARCHAR(256),
authorities VARCHAR(256),
access_token_validity INTEGER,
refresh_token_validity INTEGER,
additional_information VARCHAR(4000),
autoapprove VARCHAR(256)
);
CREATE TABLE IF NOT EXISTS oauth_client_token (
token_id VARCHAR(256),
token BLOB,
authentication_id VARCHAR(256) PRIMARY KEY,
user_name VARCHAR(256),
client_id VARCHAR(256)
);
CREATE TABLE IF NOT EXISTS oauth_access_token (
token_id VARCHAR(256),
token BLOB,
authentication_id VARCHAR(256),
user_name VARCHAR(256),
client_id VARCHAR(256),
authentication BLOB,
refresh_token VARCHAR(256)
);
CREATE TABLE IF NOT EXISTS oauth_refresh_token (
token_id VARCHAR(256),
token BLOB,
authentication BLOB
);
CREATE TABLE IF NOT EXISTS oauth_code (
code VARCHAR(256), authentication BLOB
);
CREATE TABLE IF NOT EXISTS users (
id INT AUTO_INCREMENT PRIMARY KEY,
username VARCHAR(256) NOT NULL,
password VARCHAR(256) NOT NULL,
enabled TINYINT(1),
UNIQUE KEY unique_username(username)
);
CREATE TABLE IF NOT EXISTS authorities (
username VARCHAR(256) NOT NULL,
authority VARCHAR(256) NOT NULL,
PRIMARY KEY(username, authority)
);
또한 spring-security에 User정보와 권한 정보를 삽입시켜줍니다.
-- The encrypted password is `pass`
INSERT INTO users (id, username, password, enabled) VALUES (1, 'user', '{bcrypt}$2a$10$cyf5NfobcruKQ8XGjUJkEegr9ZWFqaea6vjpXWEaSqTa2xL9wjgQC', 1);
INSERT INTO users (id, username, password, enabled) VALUES (2, 'guest', '{bcrypt}$2a$10$cyf5NfobcruKQ8XGjUJkEegr9ZWFqaea6vjpXWEaSqTa2xL9wjgQC', 1);
INSERT INTO authorities (username, authority) VALUES ('user', 'ROLE_USER');
INSERT INTO authorities (username, authority) VALUES ('guest', 'ROLE_GUEST');
AuthServerConfig
@Configuration
@EnableAuthorizationServer
class AuthServerConfig(
        @Autowired val authenticationManager: AuthenticationManager,
        @Autowired val userDetailsService: UserDetailsService,
        @Autowired val dataSource: DataSource) : AuthorizationServerConfigurerAdapter(){

    val signingKey: String = "signingKey!"

    @Bean
    fun accessTokenConverter(): JwtAccessTokenConverter = JwtAccessTokenConverter().apply {
        setSigningKey(signingKey)
    }

    @Bean
    fun tokenStore() = JwtTokenStore(accessTokenConverter())

    override fun configure(security: AuthorizationServerSecurityConfigurer) {
        security.tokenKeyAccess("permitAll()")
                .checkTokenAccess("isAuthenticated()")
                .allowFormAuthenticationForClients()

    }

    override fun configure(clients: ClientDetailsServiceConfigurer) {
        /* user 정보가 db에 있으면, datasource 연결,
        *  그렇지 않으면 inmemorydb에 하드코딩*/
        clients.jdbc(this.dataSource)
    }

    override fun configure(endpoints: AuthorizationServerEndpointsConfigurer) {
        endpoints.authenticationManager(this.authenticationManager)
                .accessTokenConverter(accessTokenConverter())
                .userDetailsService(this.userDetailsService)
                .tokenStore(tokenStore())
    }

    @Bean
    @Primary
    fun tokenServices(): DefaultTokenServices = DefaultTokenServices().apply {
        setTokenStore(tokenStore())
        setSupportRefreshToken(true)
    }
}- 8라인: JWT의 SignKey를 지정.
- 10~13라인: Use 정보를 JWT Access Token으로 변환하는 Bean. 변환시 필요한 SignKey를 세팅해줍니다.
- 15~19라인: clients(Authentication Server로 요청을 보내는 Client) 정보 역시 DB에 있을 경우, dataSource를 세팅. spring-security에는 client 정보를 삽입시켜줍니다.
-- The encrypted client_secret it `secret`
INSERT INTO oauth_client_details (client_id, client_secret, scope, authorized_grant_types, authorities, access_token_validity)
VALUES ('clientId', '{bcrypt}$2a$10$vCXMWCn7fDZWOcLnIEhmK.74dvK1Eh8ae2WrWlhr2ETPLoxQctN4.', 'read,write', 'password,refresh_token,client_credentials', 'ROLE_CLIENT', 300);
inmemory를 사용하기 위해서는 다음과 같이 세팅합니다.
override fun configure(clients: ClientDetailsServiceConfigurer) {
       clients.inMemory()
               .withClient("clientId")
               .secret(passwordEncoder.encode("secret"))
               .authorizedGrantTypes("password,refresh_token,client_credential")
               .scopes("read", "write")
}- 21~26라인: 인증 결과 어떤 정보를 반환할지 결정.
Authentication Test
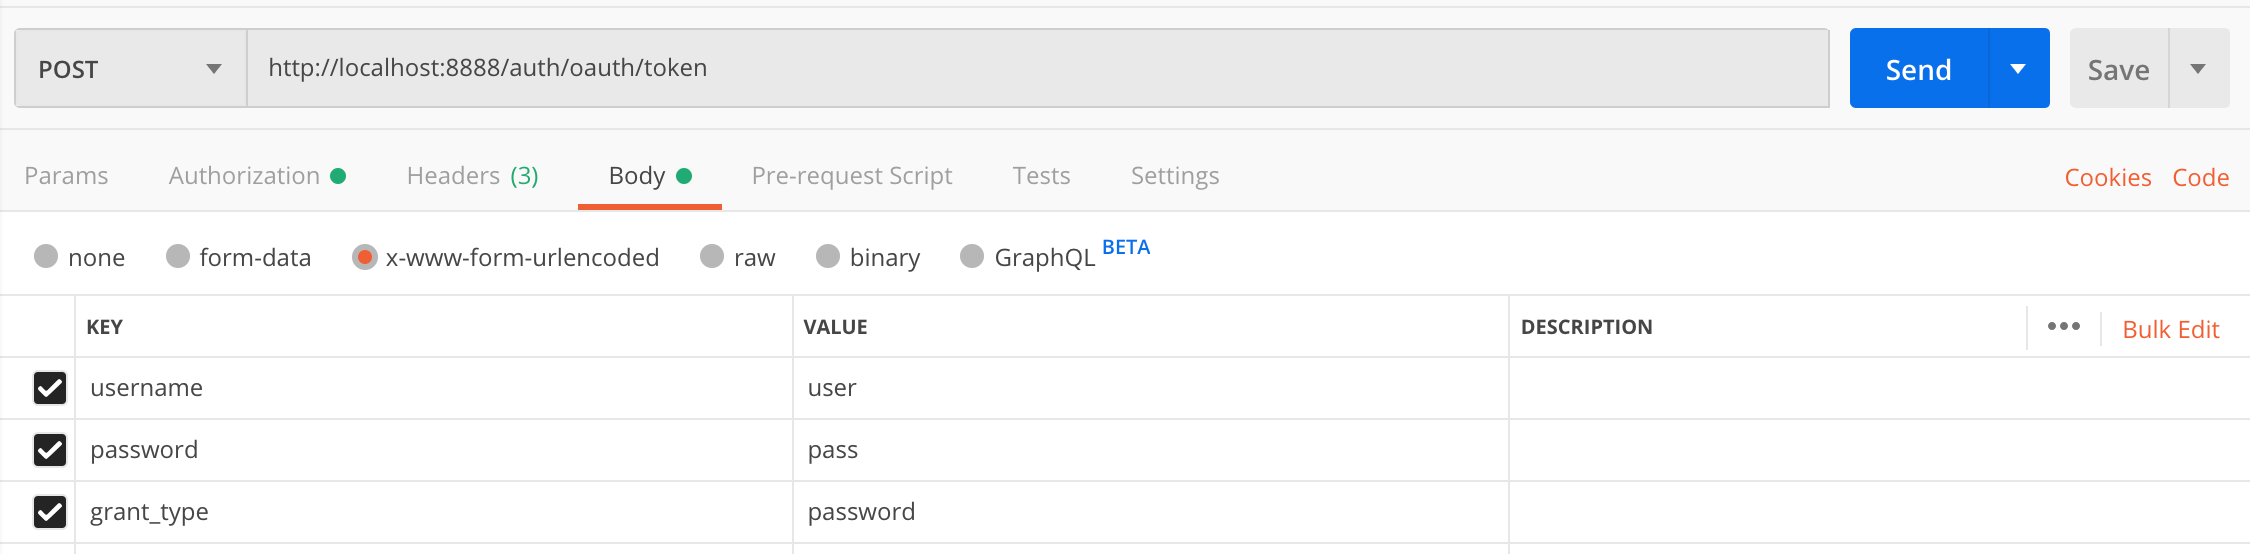
- 인증을 거치면 JWT가 발급되며, 이를 테스트하기 위해서는 /auth/oauth/token 경로로 요청을 보내면 됩니다. 가장 앞의 /auth는 application.yml에서 지정한 server.servlet.context-path로 인해 추가된 경로이며, /oauth/token은 spring-security 내부적으로 인증을 위해 추가된 API의 path입니다.
- 요청을 보낼 때에는 항상 client 정보를 함께 넘겨주어야 합니다. postman에서는 Authorization 탭에 client 정보를 입력해주면 됩니다.

- 또 주의할 점은 Content-Type을 application/x-www-form-urlencoded로 보내야 한다는 점입니다. 처음에 application/json으로 보냈는데, 입력을 제대로 받아들이지 못하는 문제가 발생했습니다.
- username, password, grant-type 필드를 필수적으로 입력해주어야 합니다.
'Infra System' 카테고리의 다른 글
| Grafana installation - Web UI Dashboard (0) | 2020.10.14 |
|---|---|
| Prometheus install - Web UI Dashboard (0) | 2020.10.14 |
| Api-gateway Server - Outer Architecture (0) | 2020.10.14 |
| Eureka Server(standalone) - Outer Architecture (0) | 2020.10.14 |
| MongoDB based Prototype - Inner Architecture (0) | 2020.10.14 |


댓글